Spring Controllers
1. 개요
일반적인 Spring Model View Controller 아키텍처에서 Front Controller의 개념이다.
주요 책임은 다음과 같다.
들어오는 요청 가로채기
요청의 페이로드를 데이터의 내부 구조로 변환
추가 처리를 위해 데이터를 모델로 전송
모델에서 처리된 데이터를 가져오고 렌더링을 위해 해당 데이터를 보기로 이동
Spring MVC의 상위 수준 흐름에 대한 빠른 다이어그램이다.
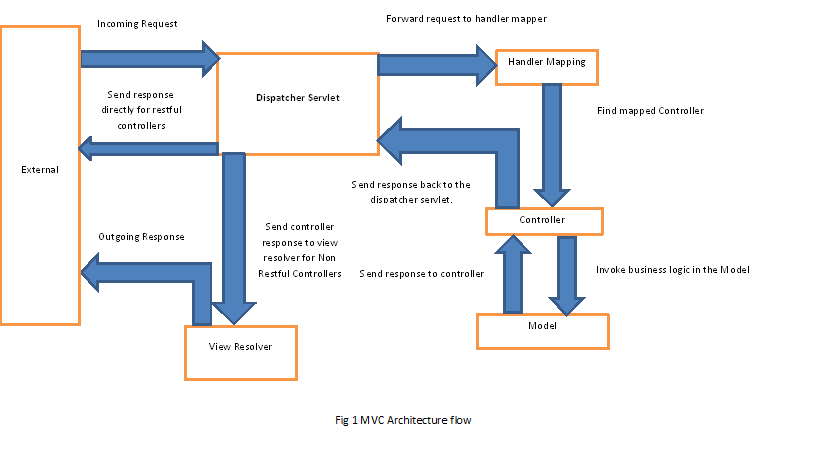
DispatcherServlet은 아키텍처에서 Front Controller 역할을 한다.
다이어그램은 일반적인 MVC 컨트롤러와 RESTful 컨트롤러 모두에 적용할 수 있지만 약간의 차이가 있다.
전통적인 접근 방식에서 MVC 애플리케이션은 서비스 지향이 아니다. 따라서 Controller에서 받은 데이터를 기반으로 최종 뷰를 렌더링하는 View Resolver가 있다.
RESTful 애플리케이션은 서비스 지향적이고 원시 데이터(일반적으로 JSON/XML)를 반환하도록 설계되었다. 이러한 애플리케이션은 뷰 렌더링을 수행하지 않기 때문에 뷰 확인자가 없으며 컨트롤러는 일반적으로 HTTP 응답을 통해 직접 데이터를 보낸다.
2. 메이븐 종속성
Spring Boot에서 Spring MVC로 작업하기 위해 먼저 Maven 종속성을 처리한다.
1
2
3
4
5
<dependency>
    <groupId>org.springframework.boot</groupId>
    <artifactId>spring-boot-starter-web</artifactId>
    <version>3.0.2</version>
</dependency>
라이브러리의 최신 버전을 얻으려면 Maven Central에서 spring-boot-starter-web을 확인한다.
3. 스프링 부트 웹 구성
Spring Boot를 구성하는 방법이다. classpath에 thymeleaf 종속성을 추가했기 때문에 이에 대한 @Beans를 구성할 필요가 없다.
1
2
3
4
<dependency>
    <groupId>org.springframework.boot</groupId>
    <artifactId>spring-boot-starter-thymeleaf</artifactId>
</dependency>
WebConfig에서 기본 서블릿을 활성화하려면 Geeting 객체와 ObjectMapper에 대한 bean을 추가해야 한다.
1
2
3
4
5
6
7
8
9
10
11
12
13
14
15
16
@Bean
public WebServerFactoryCustomizer<ConfigurableServletWebServerFactory> enableDefaultServlet() {
    return factory -> factory.setRegisterDefaultServlet(true);
}

@Bean
public Greeting greeting() {
    Greeting greeting = new Greeting();
    greeting.setMessage("Hello World !!");
    return greeting;
}

@Bean
public ObjectMapper objectMapper() {
    return new ObjectMapper();
}
예를 들어 컨트롤러가 “welcome” 이라는 뷰를 반환 하면 뷰 확인자는 템플릿 폴더에서 “welcome.html” 이라는 페이지를 확인하려고 시도한다. 이것은 thyeamleaf가 view를 검색할 기본 폴더이다.
4. MVC 컨트롤러
MVC 스타일 컨트롤러를 구현한다.
모델 맵과 뷰 객체를 포함하는 ModelAndView 객체를 반환하는 방법을 확인한다. 둘 다 데이터 렌더링을 위해 View Resolver에서 사용된다.
1
2
3
4
5
6
7
8
9
10
11
12
13
@Controller
@RequestMapping(value = "/test")
public class TestController {

    @GetMapping
    public ModelAndView getTestData() {
        ModelAndView mv = new ModelAndView();
        mv.setViewName("welcome");
        mv.getModel().put("data", "Welcome home man");

        return mv;
    }
}
먼저 TestController라는 컨트롤러를 만들고 “/test” 경로에 매핑했다. 클래스에서 ModelAndView 개체를 반환하고 GET 요청에 매핑되는 메서드를 만들었다. 따라서 “test”로 끝나는 모든 URL 호출은 DispatcherServlet에 의해 TestController의 getTestData 메소드로 라우팅된다.
그리고 물론 좋은 측정을 위해 일부 모델 데이터와 함께 ModelAndView 개체를 반환하고 있다.
뷰 개체의 이름은 “welcome”으로 설정되어 있다. 위에서 설명한 것처럼 View Resolver는 “welcome.html” 이라는 템플릿 폴더에서 페이지를 검색한다.
아래에서 예제 GET 작업의 결과를 볼 수 있다.

5. REST 컨트롤러
Spring RESTful 애플리케이션의 설정은 MVC 애플리케이션의 설정과 동일 하지만 유일한 차이점은 View Resolver 또는 모델 맵이 없다는 것이다.
API는 일반적으로 원시 데이터를 클라이언트, XML 및 JSON 표현으로 다시 반환하므로 DispatcherServlet은 보기 확인자를 우회하고 HTTP 응답 본문에서 바로 데이터를 반환한다.
간단한 RESTful 컨트롤러 구현이다.
1
2
3
4
5
6
7
8
9
10
11
12
@RestController
public class RestController {

    @GetMapping(value = "/student/{studentId}")
    public Student getTestData(@PathVariable Integer studentId) {
        Student student = new Student();
        student.setName("Peter");
        student.setId(studentId);

        return student;
    }
}
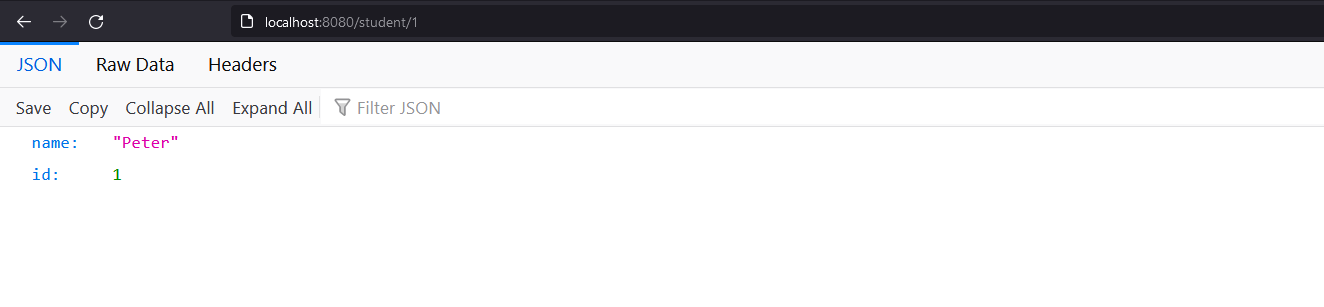
위의 출력은 학생 ID가 1인 API에 GET 요청을 보낸 결과이다.
@RequestMapping 주석이 잠재력을 최대한 활용하기 위해 실제로 탐색해야 하는 핵심 주석 중 하나이다.
6. 스프링 부트와 @RestController 어노테이션
Spring Boot의 @RestController 어노테이션은 기본적으로 항상 @ResponseBody를 정의하지 않아도 되는 빠른 지름길이다.
다음은 이 새 주석을 사용하는 이전 예제 컨트롤러이다.
1
2
3
4
5
6
7
8
9
10
11
@RestController
public class RestAnnotatedController {
    @GetMapping(value = "/annotated/student/{studentId}")
    public Student getData(@PathVariable Integer studentId) {
        Student student = new Student();
        student.setName("Peter");
        student.setId(studentId);

        return student;
    }
}