Spring MVC Forms
1. Model
양식에 바인딩할 간단한 엔터티를 정의한다.
1
2
3
4
5
6
7
public class Employee {
    private String name;
    private long id;
    private String contactNumber;

    // standard getters and setters
}
이것은 양식 지원 개체가 될 것이다.
2. View
실제 양식과 이를 포함하는 HTML 파일을 정의한다. 새 직원이 생성/등록되는 페이지를 사용할 것이다.
1
2
3
4
5
6
7
8
9
10
11
12
13
14
15
16
17
18
19
20
21
22
23
24
25
26
27
28
29
<%@ taglib prefix="form" uri="http://www.springframework.org/tags/form"%>
<html>
    <head>
    </head>
    <body>
        <h3>Welcome, Enter The Employee Details</h3>
        <form:form method="POST"
          action="/spring-mvc-xml/addEmployee" modelAttribute="employee">
             <table>
                <tr>
                    <td><form:label path="name">Name</form:label></td>
                    <td><form:input path="name"/></td>
                </tr>
                <tr>
                    <td><form:label path="id">Id</form:label></td>
                    <td><form:input path="id"/></td>
                </tr>
                <tr>
                    <td><form:label path="contactNumber">
                      Contact Number</form:label></td>
                    <td><form:input path="contactNumber"/></td>
                </tr>
                <tr>
                    <td><input type="submit" value="Submit"/></td>
                </tr>
            </table>
        </form:form>
    </body>
</html>
양식을 정의하는 데 도움이 되도록 JSP 페이지(양식 taglib)에 태그 라이브러리를 포함하고 있다.
여기서 <form:form> 태그는 중요한 역할을 한다. 일반 HTLM <form> 태그와 매우 유사하지만 modelAttribute 특성은 이 양식을 지원하는 모델 개체의 이름을 지정하는 키이다.
1
<form:form method="POST" action="/SpringMVCFormExample/addEmployee" modelAttribute="employee">
이것은 나중에 컨트롤러에서 @ModelAttribute에 해당한다.
각 입력 필드는 Spring Form taglib - form:prefix의 또 다른 유용한 태그를 사용하고 있다. 이러한 각 필드는 경로 속성을 지정한다. 이는 모델 속성(이 경우 Employee 클래스)의 getter/setter에 해당해야 한다. 페이지가 로드되면 입력 필드는 입력 필드에 바인딩된 각 필드의 getter를 호출하는 Spring에 의해 채워진다. 양식이 제출되면 setter가 호출되어 양식 값을 개체에 저장한다.
양식이 제출되면 컨트롤러의 POST 핸들러가 호출되고 양식은 전달한 직원 인수에 자동으로 바인딩된다.
3. Controller
백엔드를 처리할 컨트롤러이다.
1
2
3
4
5
6
7
8
9
10
11
12
13
14
15
16
17
18
19
20
@Controller
public class EmployeeController {

    @RequestMapping(value = "/employee", method = RequestMethod.GET)
    public ModelAndView showForm() {
        return new ModelAndView("employeeHome", "employee", new Employee());
    }

    @RequestMapping(value = "/addEmployee", method = RequestMethod.POST)
    public String submit(@Valid @ModelAttribute("employee")Employee employee,
      BindingResult result, ModelMap model) {
        if (result.hasErrors()) {
            return "error";
        }
        model.addAttribute("name", employee.getName());
        model.addAttribute("contactNumber", employee.getContactNumber());
        model.addAttribute("id", employee.getId());
        return "employeeView";
    }
}
컨트롤러는 양식에 데이터를 표시하기 위한 GET과 양식의 제출을 통한 작성 작업을 위한 POST의 두 가지 간단한 작업을 정의한다.
또한 “employee”라는 객체가 모델에 추가되지 않은 경우 JSP가 양식을 “employee” 모델 속성에 바인딩하도록 설정되기 때문에 Spring은 JSP에 액세스하려고 할 때 불평할 것이다.
1
2
3
4
java.lang.IllegalStateException:
  Neither BindingResult nor plain target object
    for bean name 'employee' available as request attribute
  at o.s.w.s.s.BindStatus.<init>(BindStatus.java:141)
양식 지원 개체에 액세스하려면 @ModelAttribute 주석을 통해 이를 주입해야 한다.
메서드 인수에 있는 것은 <em>@ModelAttribute</em>인수가 모델에서 검색됨을 나타낸다. 모델에 없는 경우 인수가 먼저 인스턴스화된 다음 모델에 추가된다.
4. 바인드 오류 처리
기본적으로 Spring MVC는 요청 바인딩 중에 오류가 발생하면 예외를 발생시킨다. 이것은 일반적으로 우리가 원하는 것이 아니라 사용자에게 이러한 오류를 표시해야 한다. BindingResult를 컨트롤러 메서드에 인수로 추가하여 사용할 것이다.
1
public String submit(@Valid @ModelAttribute("employee") Employee employee, BindingResult result, ModelMap model)
BindingResult 인수는 양식 지원 개체 바로 뒤에 위치해야 한다. 이는 메서드 인수의 순서가 중요한 드문 경우 중 하나이다. 그렇지 않으면 다음 예외가 발생한다.
1
2
3
java.lang.IllegalStateException:
  Errors/BindingResult argument declared without preceding model attribute.
    Check your handler method signature!
더 이상 예외가 발생하지 않는다. 대신 submit 메서드에 전달되는 BindingResult에 오류가 등록된다. 이 시점에서 다양한 방법으로 이러한 오류를 처리할 수 있다. 예를 들어 작업을 취소할 수 있다.
1
2
3
4
5
6
7
8
9
10
@RequestMapping(value = "/addEmployee", method = RequestMethod.POST)
public String submit(@Valid @ModelAttribute("employee")Employee employee,
  BindingResult result,  ModelMap model) {
    if (result.hasErrors()) {
        return "error";
    }

    //Do Something
    return "employeeView";
}
결과에 오류가 포함된 경우 이러한 오류를 올바르게 표시하기 위해 사용자에게 다른 보기를 반환하는 방법이 있다. 해당 뷰를 확인한다.
- error.jsp
1
2
3
4
5
6
7
8
9
10
11
12
13
14
<html>
    <head>
    </head>

    <body>
        <h3>Please enter the correct details</h3>
        <table>
            <tr>
                <td><a href="employee">Retry</a></td>
            </tr>
        </table>
    </body>

</html>
5. 직원 표시
새 직원을 생성하는 것 외에도 간단하게 직원을 표시할 수 있다.
1
2
3
4
5
6
7
8
9
10
11
12
13
14
15
16
17
<body>
    <h2>Submitted Employee Information</h2>
    <table>
        <tr>
            <td>Name :</td>
            <td>${name}</td>
        </tr>
        <tr>
            <td>ID :</td>
            <td>${id}</td>
        </tr>
        <tr>
            <td>Contact Number :</td>
            <td>${contactNumber}</td>
        </tr>
    </table>
</body>
JSP 페이지는 단순히 EL 표현식을 사용하여 모델의 Employee 객체 속성 값을 표시한다.
6. 애플리케이션 테스트
Tomcat 서버에 간단한 애플리케이션을 배포하고 로컬에서 액세스할 수 있다.
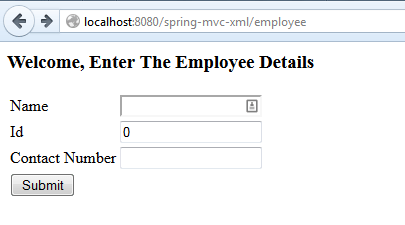
http://localhost:8080/spring-mvc-xml/employee
제출 작업 전 기본 양식을 포함하는 보기이다.
제출 후 데이터가 표시된다.
Spring MVC와 validation이 있는 간단한 형식의 작업 예제 이다.

