Spring OpenAPI 3.0으로 REST API 문서화
1. springdoc-openapi 설정
Spring Boot 3.x에서는 springdoc-openapi 버전 2를 사용해야 한다.
1
2
3
4
5
<dependency>
    <groupId>org.springdoc</groupId>
    <artifactId>springdoc-openapi-starter-webmvc-ui</artifactId>
    <version>2.2.0</version>
</dependency>
1) OpenAPI Description 경로
종속성을 올바르게 설정한 후 애플리케이션을 실행하고 기본 경로인 /v3/api-docs에서 OpenAPI 설명을 찾을 수 있다.
1
http://localhost:8080/v3/api-docs
또한 springdoc.api-docs 속성을 사용하여 application.properties의 경로를 사용자 정의할 수 있다. 예를 들어 경로를 /api-docs로 설정할 수 있다.
1
springdoc.api-docs.path=/api-docs
그러면 다음 문서에 액세스할 수 있습니다.
1
http://localhost:8080/api-docs
OpenAPI 정의는 기본적으로 JSON 형식이다. yaml 형식의 경우 다음에서 정의를 얻을 수 있다.
1
http://localhost:8080/api-docs.yaml
2. Swagger UI와 통합
OpenAPI 3 사양을 생성하는것 외에도 springdoc-openapi를 Swagger UI와 통합하여 API 사양과 상호 작용하고 엔드포인트를 실행할 수 있다.
springdoc-openapi 종속성에는 이미 Swagger UI가 포함되어 있으므로 다음 위치에서 API 문서에 액세스할 수 있도록 설정되었다.
1
http://localhost:8080/swagger-ui/index.html
1) swagger-ui 속성 지원
springdoc-openapi 라이브러리는 swagger-ui 속성도 지원한다. 이는 springdoc.swagger-ui 접두어를 사용하여 Spring Boot 속성으로 사용할 수 있다.
예를 들어, application.properties 파일 내에서 springdoc.swagger-ui.path 속성을 변경하여 API 문서의 경로를 사용자 정의할 수 있다.
1
springdoc.swagger-ui.path=/swagger-ui-custom.html
이제 API 문서는 http://localhost:8080/swagger-ui-custom.html에서 볼 수 있다.
또 다른 예로, springdoc.swagger-ui.operationsSorter 속성을 사용하여 HTTP 메서드에 따라 API 경로를 정렬할 수 있다.
1
springdoc.swagger-ui.operationsSorter=method
2) 샘플 API
애플리케이션에 Book 관리를 위한 컨트롤러가 있다고 가정한다.
1
2
3
4
5
6
7
8
9
10
11
12
13
14
15
16
17
18
19
20
21
22
23
24
25
@RestController
@RequestMapping("/api/book")
public class BookController {

    @Autowired
    private BookRepository repository;

    @GetMapping("/{id}")
    public Book findById(@PathVariable long id) {
        return repository.findById(id)
            .orElseThrow(() -> new BookNotFoundException());
    }

    @GetMapping("/")
    public Collection<Book> findBooks() {
        return repository.getBooks();
    }

    @PutMapping("/{id}")
    @ResponseStatus(HttpStatus.OK)
    public Book updateBook(
      @PathVariable("id") final String id, @RequestBody final Book book) {
        return book;
    }
}
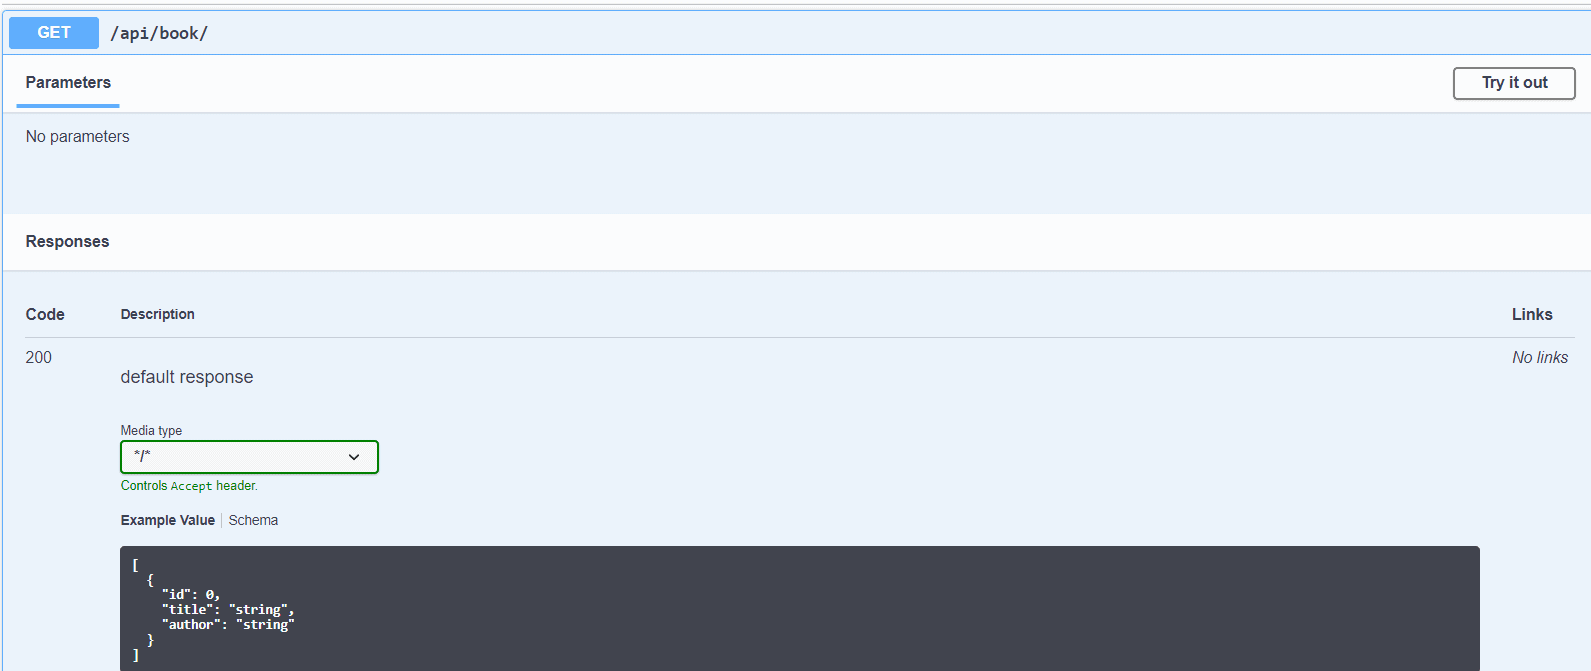
그런 다음 애플리케이션을 실행하면 다음 위치에서 설명서를 볼 수 있다.
1
http://localhost:8080/swagger-ui-custom.html

/api/book 엔드포인트로 드릴다운하여 요청 및 응답에 대한 세부 정보를 확인한다.
3. Spring WebFlux와 springdoc-openapi 통합
Spring WebFlux 애플리케이션에서 springdoc.swagger-ui 속성을 활성화할 수도 있다. 이를 통해 Spring WebFlux 애플리케이션에서 springdoc-openapi와 Swagger UI를 쉽게 통합할 수 있다. 이를 활성화하기 위해 pom.xml 파일 내에 springdoc-openapi-webflux-ui 종속성을 추가한다.
1
2
3
4
5
<dependency>
    <groupId>org.springdoc</groupId>
    <artifactId>springdoc-openapi-starter-webflux-ui</artifactId>
    <version>2.1.0</version>
</dependency>
4. Pagination 정보
Spring Data JPA는 Spring MVC와 매우 원활하게 통합된다. 이러한 통합의 한 가지 예는 Pageable 지원이다.
1
2
3
4
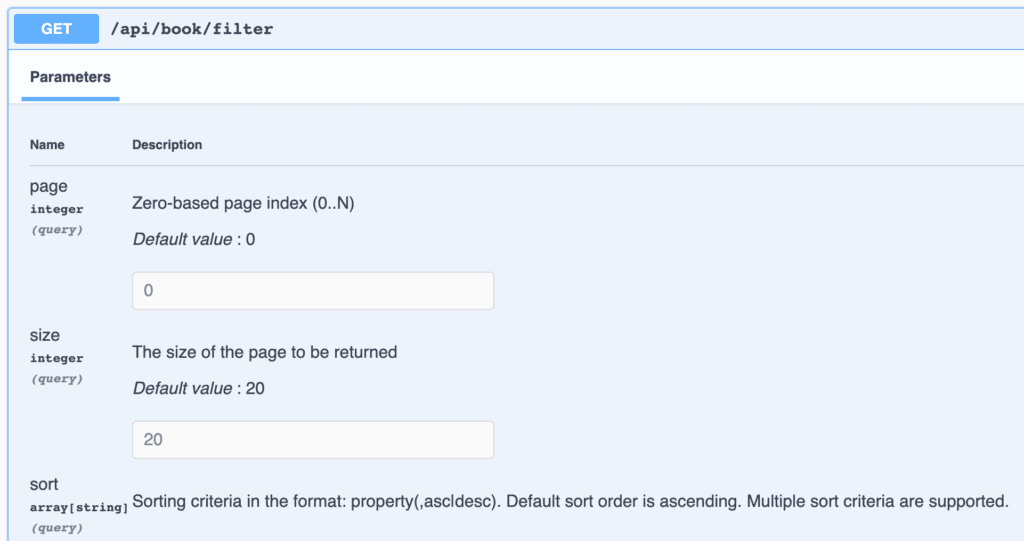
@GetMapping("/filter")
public Page<Book> filterBooks(@ParameterObject Pageable pageable) {
return repository.getBooks(pageable);
}
Pageable에 대한 지원은 springdoc-openapi v1.6.0부터 기본적으로 제공되었다. page, size, 그리고 sort query 매개변수가 생성된 문서에 추가된다.
5. springdoc-openapi Maven 플러그인 사용
springdoc-openapi 라이브러리는 JSON 및 YAML 형식으로 OpenAPI 설명을 생성하는 Maven 플러그인 springdoc-openapi-maven-plugin을 제공한다.
springdoc-openapi-maven-plugin 플러그인은 spring-boot-maven 플러그인과 함께 작동한다. Maven은 integration-test 단계에서 openapi 플러그인을 실행한다 .
pom.xml에서 플러그인을 구성하는 방법이다.
1
2
3
4
5
6
7
8
9
10
11
12
13
14
15
16
17
18
19
20
21
22
23
24
25
26
27
28
29
30
31
32
<plugin>
    <groupId>org.springframework.boot</groupId>
    <artifactId>spring-boot-maven-plugin</artifactId>
    <version>3.1.5</version>
    <executions>
        <execution>
            <id>pre-integration-test</id>
            <goals>
                <goal>start</goal>
            </goals>
        </execution>
        <execution>
            <id>post-integration-test</id>
            <goals>
                <goal>stop</goal>
            </goals>
        </execution>
    </executions>
</plugin>
<plugin>
    <groupId>org.springdoc</groupId>
    <artifactId>springdoc-openapi-maven-plugin</artifactId>
    <version>1.4</version>
    <executions>
        <execution>
            <phase>integration-test</phase>
            <goals>
                <goal>generate</goal>
            </goals>
        </execution>
    </executions>
</plugin>
또한 사용자 정의 값을 사용하도록 플러그인을 구성할 수도 있습니다.
1
2
3
4
5
6
7
8
9
10
<plugin>
    <executions>
        .........
    </executions>
    <configuration>
        <apiDocsUrl>http://localhost:8080/v3/api-docs</apiDocsUrl>
        <outputFileName>openapi.json</outputFileName>
        <outputDir>${project.build.directory}</outputDir>
    </configuration>
</plugin>
플러그인에 대해 구성할 수 있는 매개변수를 자세히 살펴보겠습니다.
apiDocsUrl - JSON 형식으로 문서에 액세스할 수 있는 URL이다. 기본값은
http://localhost:8080/v3/api-docsoutputFileName - 정의가 저장되는 파일의 이름이다. 기본값은
openapi.jsonoutputDir - 문서가 저장된 디렉터리의 절대 경로이다. 기본값은
${project.build.directory}
6. JSR-303 Bean Validation 사용하여 자동 문서 생성
모델에 @NotNull, @NotBlank, @Size, @Min 및 @Max와 같은 JSR-303 Bean 유효성 검사 주석이 포함된 경우 springdoc-openapi 라이브러리는 이를 사용하여 해당 제약 조건에 대한 추가 스키마 문서를 생성한다.
Book Bean을 사용하는 예이다.
1
2
3
4
5
6
7
8
9
10
11
12
13
public class Book {

    private long id;

    @NotBlank
    @Size(min = 0, max = 20)
    private String title;

    @NotBlank
    @Size(min = 0, max = 30)
    private String author;

}
이제 Book Bean에 대해 생성된 문서는 좀 더 많은 정보를 제공한다.

7. @ControllerAdvice 및 @ResponseStatus를 사용하여 문서 생성
@RestControllerAdvice 클래스의 메소드에 @ResponseStatus를 사용하면 응답 코드에 대한 문서가 자동으로 생성된다. 이 @RestControllerAdvice 클래스에서는 두 메서드에 @ResponseStatus 주석이 추가된다.
1
2
3
4
5
6
7
8
9
10
11
12
13
14
15
@RestControllerAdvice
public class GlobalControllerExceptionHandler {

    @ExceptionHandler(ConversionFailedException.class)
    @ResponseStatus(HttpStatus.BAD_REQUEST)
    public ResponseEntity<String> handleConversion(RuntimeException ex) {
        return new ResponseEntity<>(ex.getMessage(), HttpStatus.BAD_REQUEST);
    }

    @ExceptionHandler(BookNotFoundException.class)
    @ResponseStatus(HttpStatus.NOT_FOUND)
    public ResponseEntity<String> handleBookNotFound(RuntimeException ex) {
        return new ResponseEntity<>(ex.getMessage(), HttpStatus.NOT_FOUND);
    }
}
결과적으로 이제 응답 코드 400 및 404에 대한 문서를 볼 수 있다.
8. @Operation 및 @ApiResponses를 사용하여 문서 생성
다음으로 몇 가지 OpenAPI-specific annotations을 사용하여 API에 설명을 추가하는 방법이다.
이를 위해 컨트롤러의 /api/book/{id} 엔드포인트에 @Operation 및 @ApiResponses 주석을 추가한다.
1
2
3
4
5
6
7
8
9
10
11
12
13
14
@Operation(summary = "Get a book by its id")
@ApiResponses(value = {
  @ApiResponse(responseCode = "200", description = "Found the book",
    content = { @Content(mediaType = "application/json",
      schema = @Schema(implementation = Book.class)) }),
  @ApiResponse(responseCode = "400", description = "Invalid id supplied",
    content = @Content),
  @ApiResponse(responseCode = "404", description = "Book not found",
    content = @Content) })
@GetMapping("/{id}")
public Book findById(@Parameter(description = "id of book to be searched")
  @PathVariable long id) {
    return repository.findById(id).orElseThrow(() -> new BookNotFoundException());
}
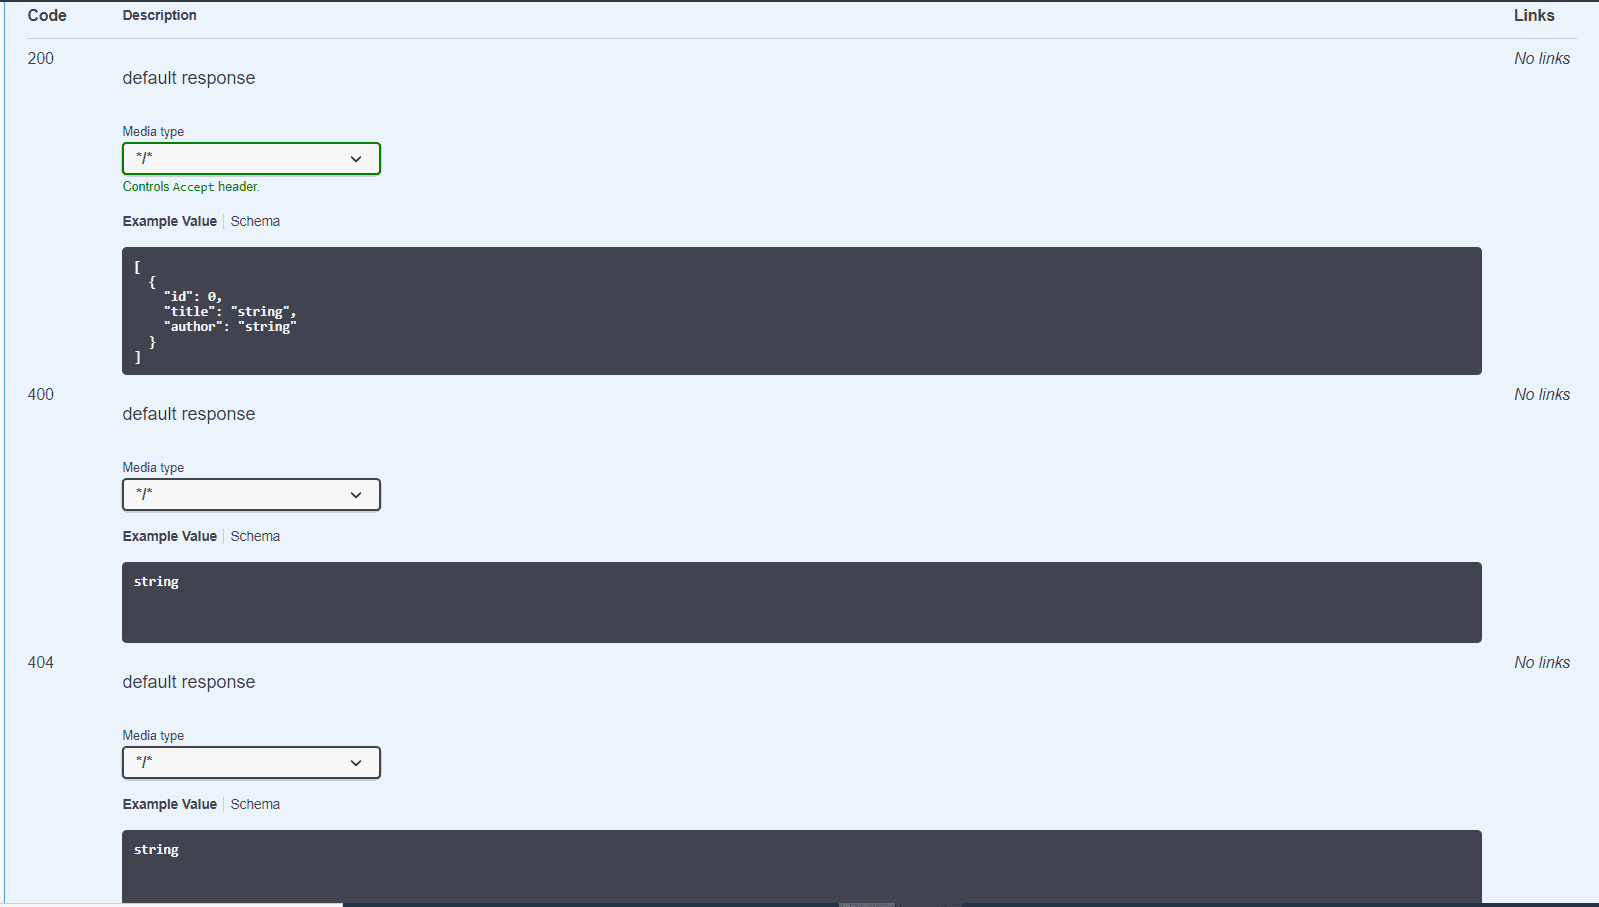
효과는 다음과 같다.
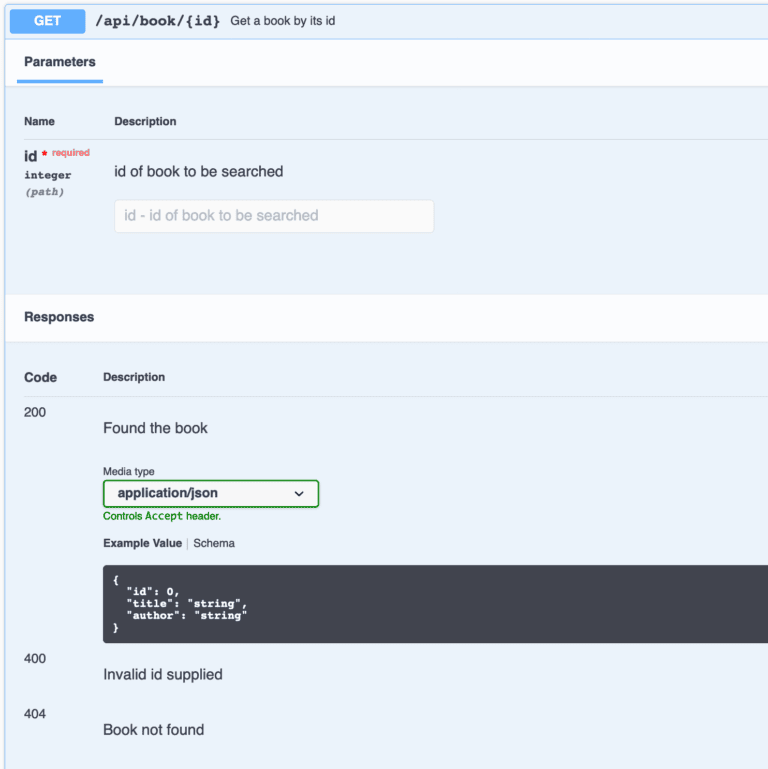
@Operation에 추가한 텍스트는 API 작업 수준에 배치된다. 마찬가지로 @ApiResponses 컨테이너 주석의 다양한 @ApiResponse 요소에 추가된 설명도 여기에 표시되어 API 응답에 의미를 추가한다.
위의 응답 400 및 404에 대한 스키마를 얻지 못했다. 빈 @Content를 정의 했으므로 해당 설명만 표시된다.
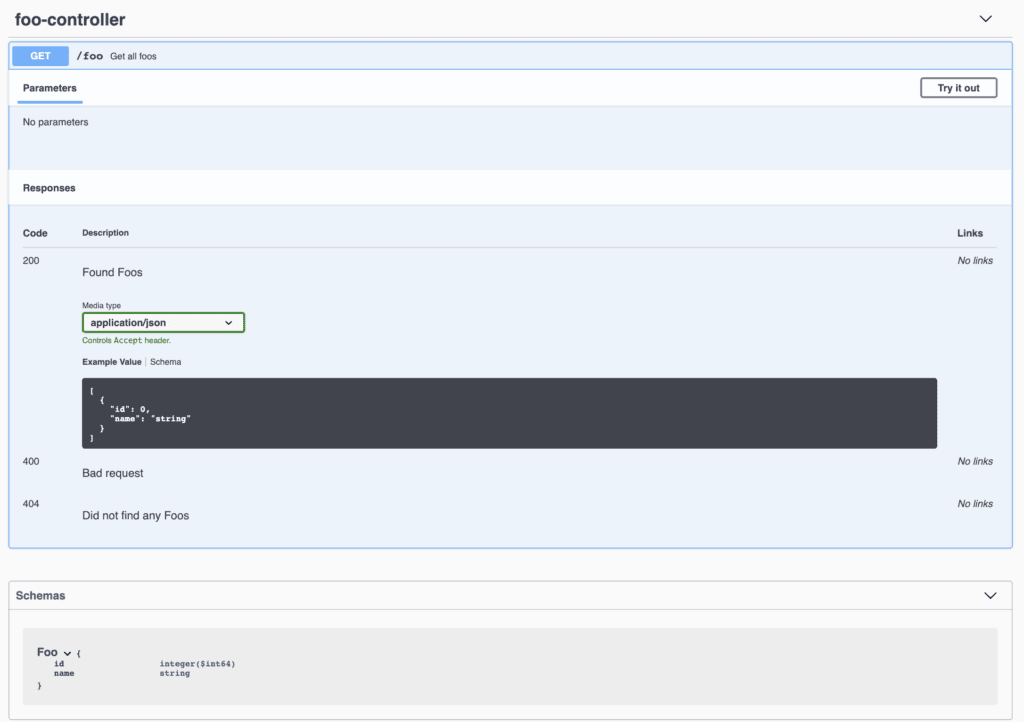
9. Kotlin 지원
Spring Boot 2.x는 Kotlin을 최고 수준으로 지원한다. Spring Boot 버전 3.x를 사용하고 있으므로 SpringDoc은 Kotlin으로 작성된 애플리케이션을 지원한다.
Kotlin에서 간단한 Foo API를 만들어 이것이 실제로 어떻게 작동하는지 확인한다.
초기 설정 후에 데이터 클래스와 컨트롤러를 추가한다. Boot App의 sub-package에 추가하여 실행 시 이전 BookController와 함께 FooController를 선택한다.
1
2
3
4
5
6
7
8
9
10
11
12
13
14
15
16
17
18
19
20
21
22
23
24
25
26
@Entity
data class Foo(
    @Id
    val id: Long = 0,

    @NotBlank
    @Size(min = 0, max = 50)
    val name: String = ""
)

@RestController
@RequestMapping("/")
class FooController() {
    val fooList: List = listOf(Foo(1, "one"), Foo(2, "two"))

    @Operation(summary = "Get all foos")
    @ApiResponses(value = [
	ApiResponse(responseCode = "200", description = "Found Foos", content = [
            (Content(mediaType = "application/json", array = (
                ArraySchema(schema = Schema(implementation = Foo::class)))))]),
	ApiResponse(responseCode = "400", description = "Bad request", content = [Content()]),
	ApiResponse(responseCode = "404", description = "Did not find any Foos", content = [Content()])]
    )
    @GetMapping("/foo")
    fun getAllFoos(): List = fooList
}
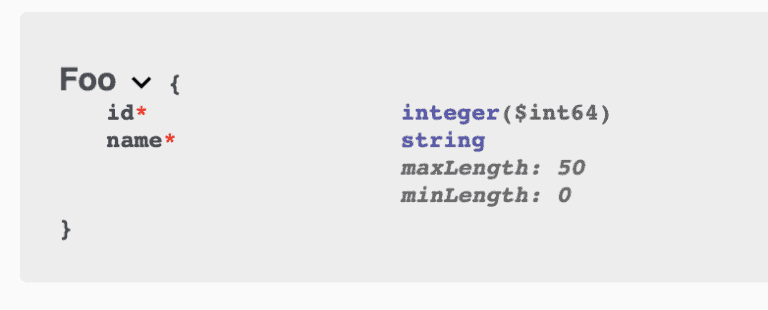
이제 API 문서 URL을 누르면 Foo API도 볼 수 있다.
Kotlin 유형의 지원을 강화하기 위해 다음 종속성을 추가할 수 있다.
1
2
3
4
5
<dependency>
    <groupId>org.springdoc</groupId>
    <artifactId>springdoc-openapi-starter-common</artifactId
    <version>2.1.0</version>
</dependency>
그 후에는 JSR-303 Bean 유효성 검사를 추가했을 때와 마찬가지로 Foo 스키마가 더 유익해 보일 것이다.